
Heat Pump Vibrating Noise: What to Check First
To track down a heat pump vibrating noise, note when it starts and where you hear it. With the power off, check for leaves, loose exterior panels, or a unit that rocks on its base. A hum that is louder indoors than outside may be traveling through the mounting or refrigerant lines. If the shaking is strong, new, or getting worse, call for heat pump repair rather than opening the unit.
Noise that appears only in heat mode may be linked to longer runs in cold weather or a defrost cycle. The key is to find the source before paying for a fix that targets the wrong kind of noise.
Common Causes of Heat Pump Vibrating Noise
When an outdoor heat pump runs, it relies on several moving mechanical parts: a high-pressure compressor, a spinning fan assembly, and pressurized refrigerant circulating through copper piping. Minor sound is completely natural, but excessive shaking indicates that mechanical energy is escaping into the surrounding structure or that internal components are wearing out.
Mechanical resonance can magnify small physical defects. A loose cabinet screw or an unbalanced fan blade can cause the sheet-metal casing to vibrate and amplify the sound. Seasonal temperature changes can also make metal components expand and contract, gradually loosening fittings over time.
Why Heat Mode Triggers a Vibrating Noise from a Heat Pump
Many homeowners notice that their system runs quietly all summer during cooling mode, only to develop a deep, rhythmic drone as soon as autumn temperatures drop. This behavior is directly tied to the mechanical demands of the heating cycle.
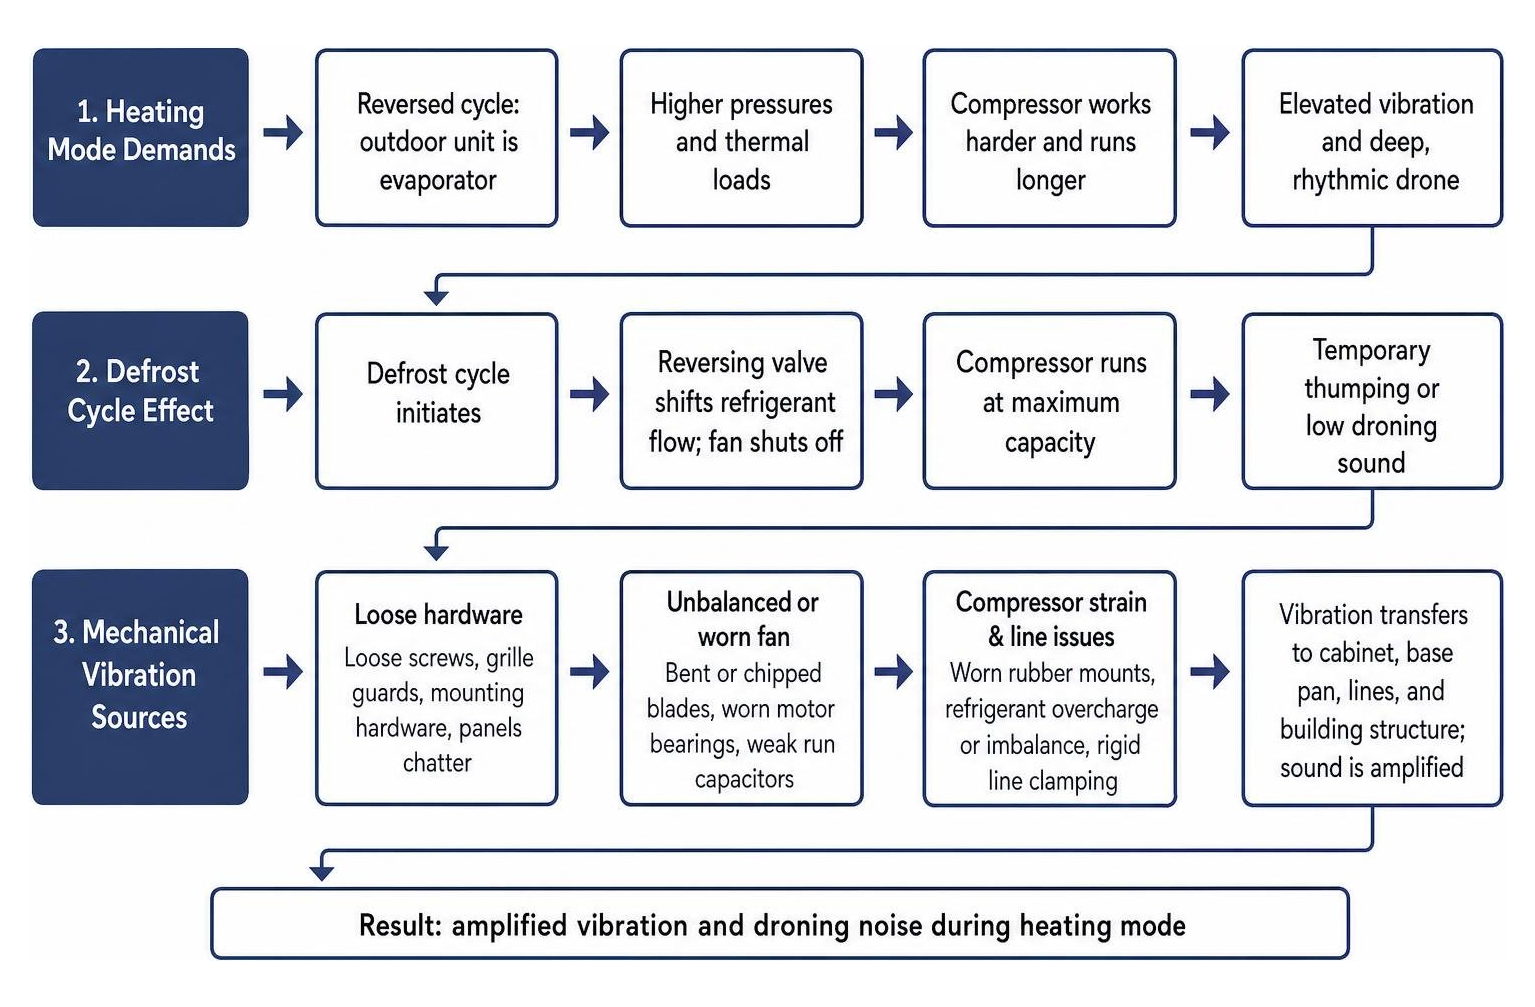
In heating mode, the refrigeration cycle reverses. The outdoor unit becomes the evaporator coil, operating under significantly higher discharge pressures and thermal loads. Because the outdoor temperature is low, the compressor must work harder and run for longer, continuous cycles to extract latent heat from the outdoor air. This extra compression effort naturally elevates vibration levels.
Additionally, the system regularly initiates a defrost cycle to clear ice buildup from the outdoor coil. During defrost, the reversing valve shifts refrigerant flow rapidly, and the outdoor fan shuts off while the compressor runs at maximum capacity. This sudden shift often creates a temporary thumping or low droning sound. While an occasional shift noise is normal, continuous droning during standard heating cycles is one of the classic signs of underlying heat pump problems that warrants a closer look.
Loose Hardware, Unbalanced Fans, and Failing Bearings
Outside elements take a toll on heating equipment. Over months of steady operation, minor operational wobbles can loosen cabinet screws, top grille guards, and mounting hardware. When panels lose tension, they chatter against the chassis.
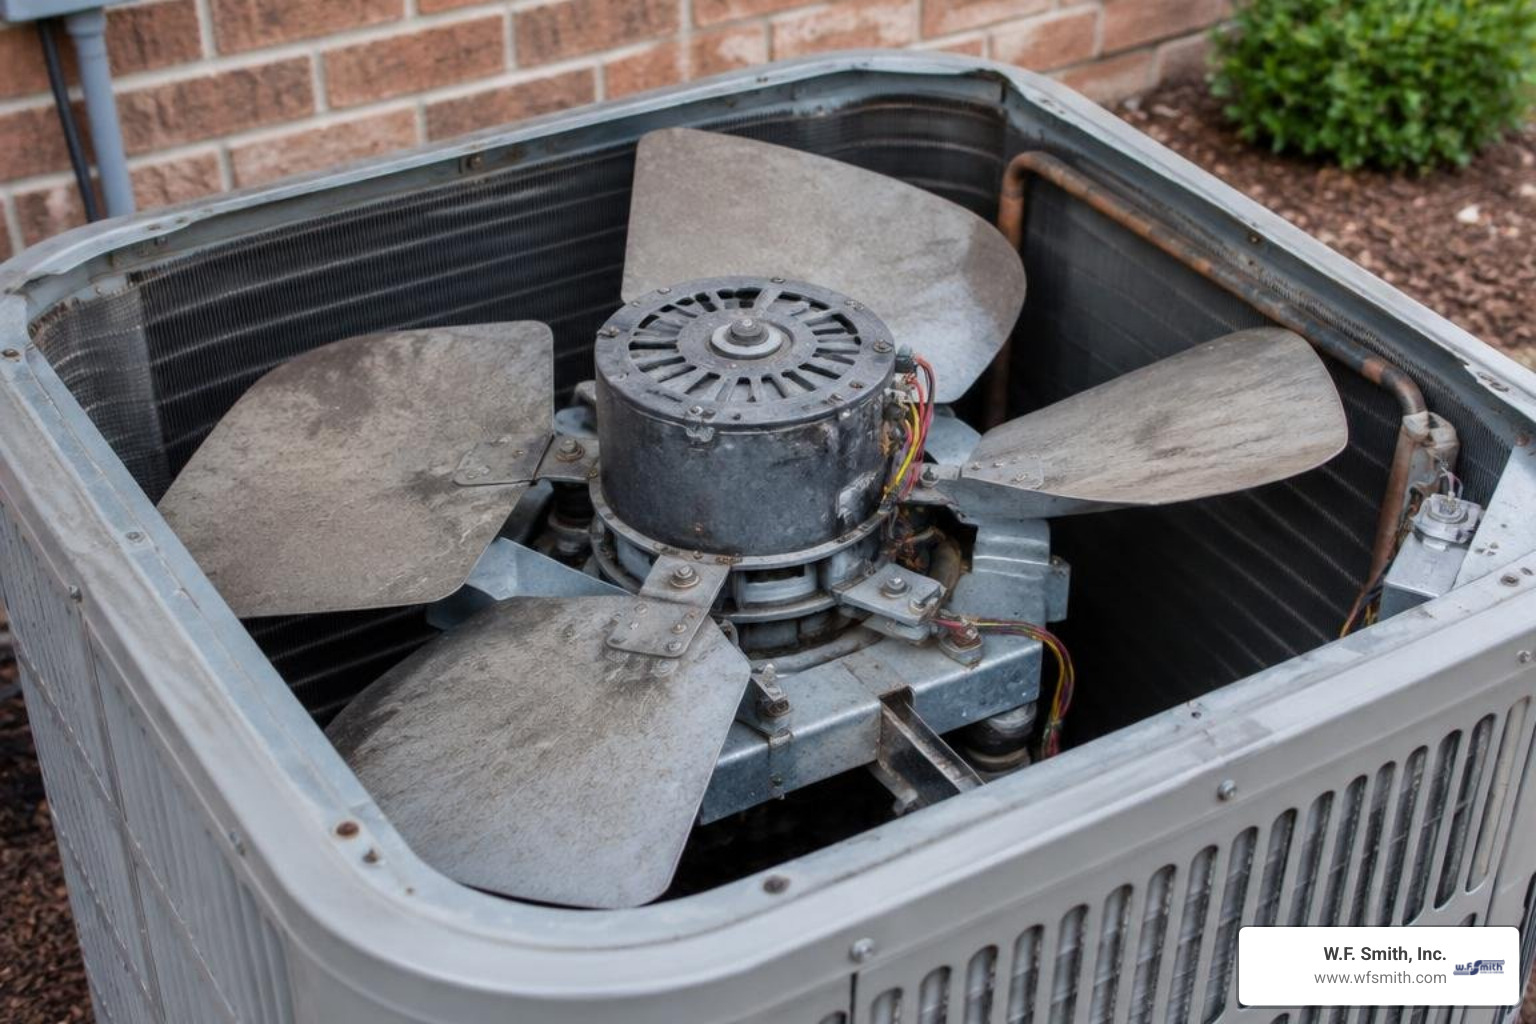
The outdoor fan assembly is another common culprit:
- Bent or Chipped Fan Blades: Even a tiny crack, minor dent, or layer of stuck wet leaves will throw the fan off balance. An unbalanced blade acts like an out-of-balance washing machine on a high spin cycle, sending aggressive vibrations through the whole housing.
- Worn Motor Bearings: Over years of exposure, sleeve or ball bearings lose lubrication. As friction increases, the center shaft wobbles inside the motor housing, producing a harsh metal rattle or rumbling sound.
- Weak Run Capacitors: An aging capacitor fails to deliver smooth, steady voltage to the fan motor. This electrical instability causes the motor to stutter, vibrate mechanically, and overheat.
Compressor Strain and Refrigerant Line Issues
The compressor is the heaviest rotating component in the entire HVAC system. Modern split systems and packaged rooftop units (RTUs) typically utilize hermetic scroll or rotary compressors mounted on thick rubber isolation grommets. Over time, these rubber feet dry out, harden, or crack, eliminating their ability to absorb mechanical shocks. When this happens, pure motor vibration transfers straight into the base pan.
Furthermore, issues within the closed refrigeration circuit can generate excessive line pulse:
- Refrigerant Overcharge or Imbalance: An incorrect charge creates hydraulic strain inside the compression chamber, leading to loud, deep humming.
- Rigid Copper Clamping: If the copper line set is clamped tightly to structural wooden joists or studs without flexible, cushioned isolators, the pulsing refrigerant turns your home’s framing into an acoustic speaker.
How to Diagnose the Source of Heat Pump Vibration
Accurate troubleshooting requires isolating where the sound originates and how it travels. Jumping straight to buying expensive soundproofing materials often leads to frustration. In fact, real-world acoustic studies show that generic sound enclosures frequently fail because they only block high-frequency airborne sounds while doing nothing to resolve low-frequency mechanical hums. A homeowner spending thousands on an acoustic wrap might find that a persistent 58 Hz droning tone travels right through the ground into their living space untouched.
A systematic diagnostic process helps pinpoint the root cause before spending money on repairs.
Diagnosing Structure-Borne vs. Airborne Heat Pump Vibrating Noise
Noise reaches your ears in two distinct ways: airborne through the atmosphere, or structure-borne through physical framing and pipework. Knowing which one you are dealing with determines the solution.
To narrow down how the noise is traveling, try a simple window check:
- Stand inside the room where the hum or vibration is most noticeable.
- Listen to its volume and pitch with the windows closed.
- Open the window that faces the outdoor unit and listen again.
If the sound becomes significantly louder with the window open, you are primarily dealing with airborne noise (fan blade turbulence, air rush, or cabinet panel chatter).
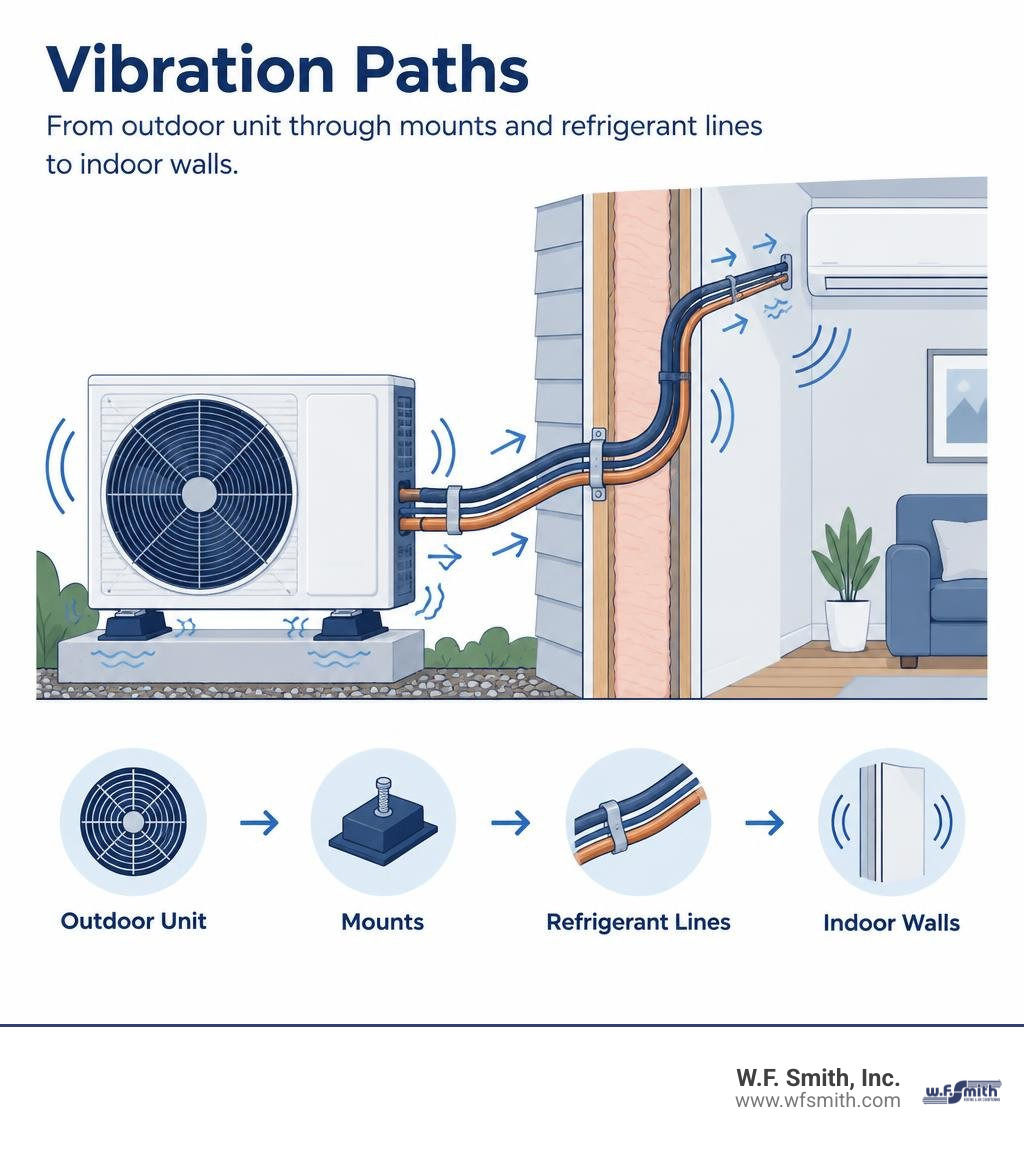
If opening the window makes almost no difference to the perceived volume, or if you feel a faint pulsing through your flooring, drywall, or furniture, you are dealing with structure-borne vibration. This occurs when the outdoor unit transmits mechanical pulses directly into foundation walls, framing studs, or through rigidly strapped refrigerant lines.
Pinpointing Fan, Compressor, or Pipework Rattles
To isolate the specific component causing the disturbance, conduct a controlled listening test while the system is operating:
| Suspected Component | Sound Characteristic | Quick Physical Check | Typical Remediation |
|---|---|---|---|
| Loose Cabinet Panels | High-pitched buzzing, chattering metal | Press hand firmly against exterior access panels | Tighten cabinet screws; apply foam damping tape |
| Fan Motor / Blades | Rhythmic wobbling, squeaking, center rattle | Visually inspect blade edges for dents or debris | Balance or replace fan blades; replace worn motor |
| Compressor | Deep, constant mechanical drone or hum | Listen near lower half of unit; check base grommets | Install new rubber isolation mounts or sound jacket |
| Refrigerant Line Set | Pulsing hum inside interior walls or ceiling | Check where copper lines enter framing/floor joists | Loosen rigid clamps; install cushioned pipe hangers |
Performing these basic checks helps you understand your equipment’s health. However, if the issue stems from internal refrigerant flow or failing electrical motors, scheduling regular routine heat pump maintenance inspections is the most reliable way to catch small mechanical imbalances before they cause major system breakdowns. For broader troubleshooting of unusual sounds, see our guide to common heat pump noises and what they mean.
Proven Solutions to Eliminate Heat Pump Vibration and Shaking
Resolving vibration requires interrupting the path between the moving component and whatever surface is amplifying the sound. Whether your system sits on a backyard pad, an elevated snow bracket, or a flat roof, mechanical isolation is essential.
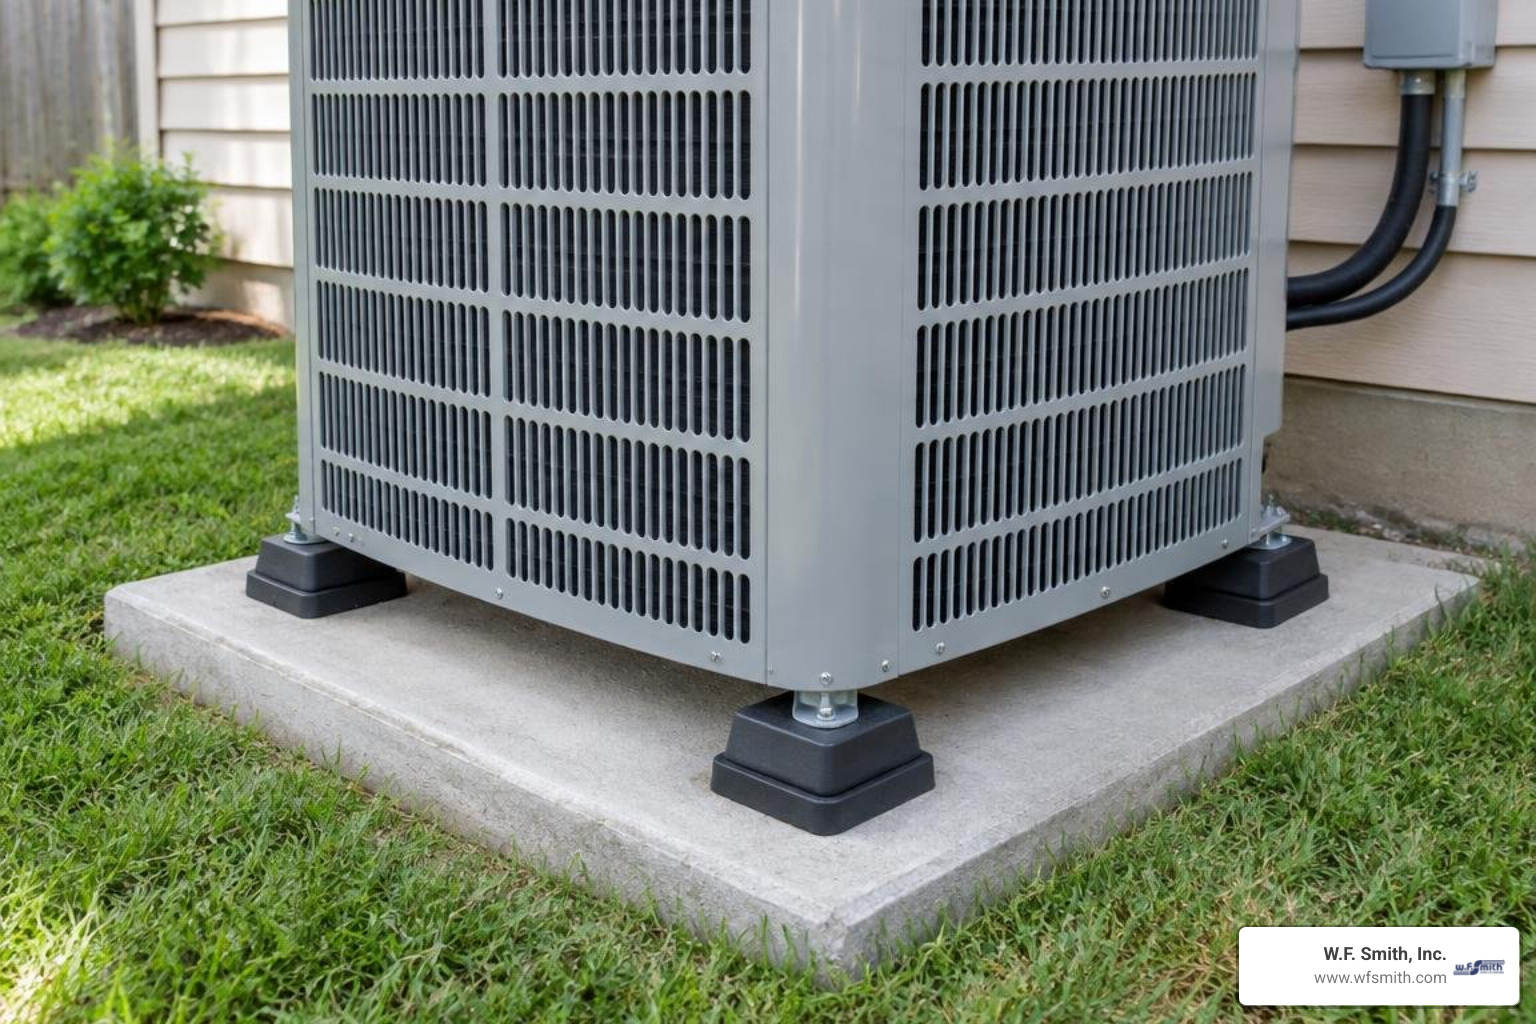
Mounting Methods: Concrete Slab vs. Wall and Roof Brackets
Where and how your outdoor unit is supported plays a massive role in sound transmission:
- Ground-Level Concrete Slabs: Placing the unit on a level composite or concrete pad set firmly on crushed stone is ideal. However, concrete alone can still transmit low-frequency hums into the ground and nearby foundation footings. Installing heavy-duty neoprene or rubber-and-cork anti-vibration pads under each corner foot absorbs mechanical movement before it reaches the earth.
- Wall-Mounted Brackets: Wall brackets keep units clear of snowdrifts and garden beds, but mounting directly to residential exterior framing can be risky. Without high-grade isolation springs or specialized rubber bushings, every rotation of the compressor sends shockwaves directly into interior wall studs.
- Roof Mounting: For properties with flat roofs, split systems and packaged rooftop units must never sit bare on structural roof joists. Proper installation requires dense elastomeric roof curbs or spring-loaded vibration isolators combined with high-density rockwool damping beneath the curb assembly.
Installing Inline Vibration Absorbers and Line Set Dampers
When the compressor runs, it sends hydraulic pulses through the copper suction and liquid lines. If these lines are soldered into a rigid, straight line without expansion bends, they act like acoustic tuning forks.
To break this acoustic pathway:
- Inline Flexible Absorbers: A certified technician can braze stainless steel braided flexible vibration absorbers directly into the suction and discharge lines right next to the compressor. These absorbers dampen hydraulic pulses before they travel toward the living areas.
- 90-Degree Expansion Loops: Incorporating gentle bends or 90-degree elbows in the copper piping near the outdoor unit helps absorb mechanical movement naturally, preventing tension buildup along the line set.
- Cushioned Pipe Clamps: Replace metal pipe straps with insulated suspension hangers that feature thick rubber or neoprene sleeves. These prevent metal-to-wood or metal-to-masonry contact along floor joists.
- Ground Anchoring: In stubborn installations where lines carry excessive resonance, securing the line set to a heavy, isolated ground stake driven into the soil outside diverts vibrational energy away from the building envelope.
Addressing these installation details is a core part of improving heat pump performance in extreme cold, ensuring the system stays quiet even under high winter workloads.
DIY Troubleshooting vs. Professional Heat Pump Repair
There are several safe steps homeowners can take to resolve minor rattles, but knowing your limits prevents equipment damage and personal injury:
Safe DIY Tasks:
- Clear Outdoor Debris: Turn off the power switch near the outdoor unit and clear out trapped twigs, pine needles, or leaves from around the outdoor coil and fan area.
- Tighten Exterior Fasteners: Use a screwdriver to snug down loose outer panel screws and grille hardware. (Do not overtighten and strip the sheet metal threads).
- Check Level and Pad Stability: Verify that the ground pad has not settled unevenly or cracked, which can tilt the compressor and increase internal friction.
Tasks Requiring a Professional Technician:
- Handling Run Capacitors: Capacitors store high-voltage electrical charges even after main power is disconnected. Never touch internal wiring or electrical compartments.
- Refrigerant Adjustments: Recovering, testing, and balancing refrigerant pressures requires EPA certification and precision manifold gauges.
- Compressor Mount Replacements: Lifting a heavy hermetic compressor to replace flattened isolation grommets requires specialized rigging and electrical safety knowledge.
When DIY steps do not stop the noise, relying on professional heat pump repair ensures the root cause is solved safely without risking your equipment warranty.
Frequently Asked Questions About Heat Pump Noise
What should I do if my technician claims the vibration is normal?
It is common for some contractors to dismiss low-frequency hums as “just how heat pumps sound.” While all split systems produce baseline decibel levels, intrusive vibration that rattles household items or disrupts sleep is not normal.
First, check your unit’s outdoor sound rating in its manufacturer technical specifications (usually between 50 and 70 dB under standard load). If an installer claims the noise is standard, ask them to measure operating sound with a calibrated meter and check the line set for direct framing contact. You can also use a mobile spectrum analyzer app to document continuous tonal spikes (such as a 50–60 Hz hum). Getting a second opinion from an experienced, established contractor will help confirm whether the mounting or internal mechanics require adjustment.
Can switching to emergency heat stop the vibrating sound?
Yes, switching your thermostat to “Emergency Heat” or “Auxiliary Heat” will instantly stop the outdoor unit from running, bringing immediate relief from outdoor shaking and line-set vibration.
However, emergency heat relies entirely on electric resistance heat strips inside your indoor air handler. These strips consume significantly more electricity than an operating heat pump compressor, causing your winter utility bills to spike dramatically if left on for more than a brief emergency period. Use this setting only as a temporary comfort measure while waiting for a repair technician.
Why does my outdoor unit vibrate more during freezing weather?
As outdoor temperatures drop below freezing, the system’s heating load peaks. Inverter-driven variable-speed heat pumps ramp up their compressors and outdoor fans to maximum RPM to extract every bit of available heat from cold air. This maximum operational speed naturally increases vibration amplitude.
Additionally, freezing moisture can form uneven frost or ice patterns across the fan blades and outdoor coil fins. When ice accumulates unevenly on a rotating fan blade, it instantly unbalances the assembly, resulting in a pronounced shudder until the unit successfully completes its defrost cycle. Taking steps toward preventing outdoor unit freeze-up helps keep winter heating cycles smooth, balanced, and quiet.
Restoring Quiet Comfort to Your Home
A vibrating or shaking heat pump is more than just an annoyance; it is a clear message from your HVAC system that something is out of balance. Ignoring persistent mechanical shuddering can allow minor issues, like a loose fan mount or uninsulated pipe clamp, to evolve into costly refrigerant leaks, damaged copper joints, or premature compressor failure.
By taking a structured approach to differentiate between airborne noises and structure-borne hums, you can ensure that fixes target the real source of the problem.
If your heating system continues to shake, drone, or rattle despite basic checks, contact our professional heat pump repair technicians for safe diagnosis and repair. Backed by 80 years of family-owned service across the greater Philadelphia area, our certified technicians specialize in diagnosing complex split system and rooftop unit issues. With 24/7 emergency service and a 100% satisfaction guarantee, we will ensure your home stays warm, quiet, and comfortable all winter long.