Fix a Leaking or Noisy Ductless Condensate Pump Before It Overflows
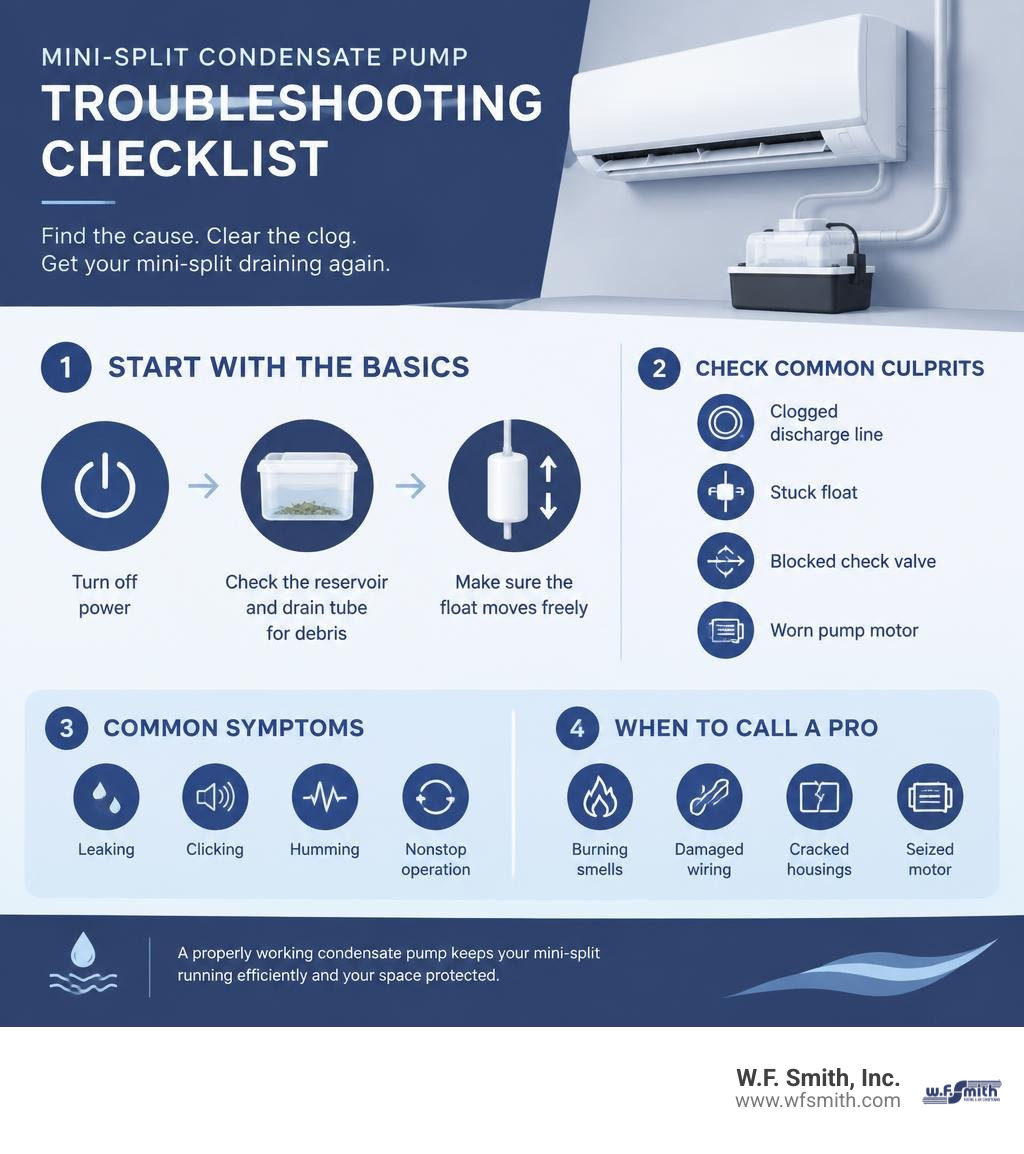
For most ductless condensate pump repair problems, start by turning off power, checking the reservoir and drain tube for slime or debris, and testing whether the float moves freely. A clogged discharge line, stuck float, blocked check valve, or worn pump motor can cause leaking, clicking, humming, or nonstop operation.
Do not keep running the mini-split if water is pooling beneath the indoor unit. A failed pump can overflow and may trigger its safety switch, shutting down cooling to help prevent water damage.
This guide explains how to safely find the cause, clean common clogs, test electrical parts, and decide when a new pump is the smarter investment. Many repairs are simple, but burning smells, damaged wiring, cracked housings, or a seized motor are good reasons to call for professional help.
Common Symptoms and Root Causes of Mini-Split Pump Malfunctions
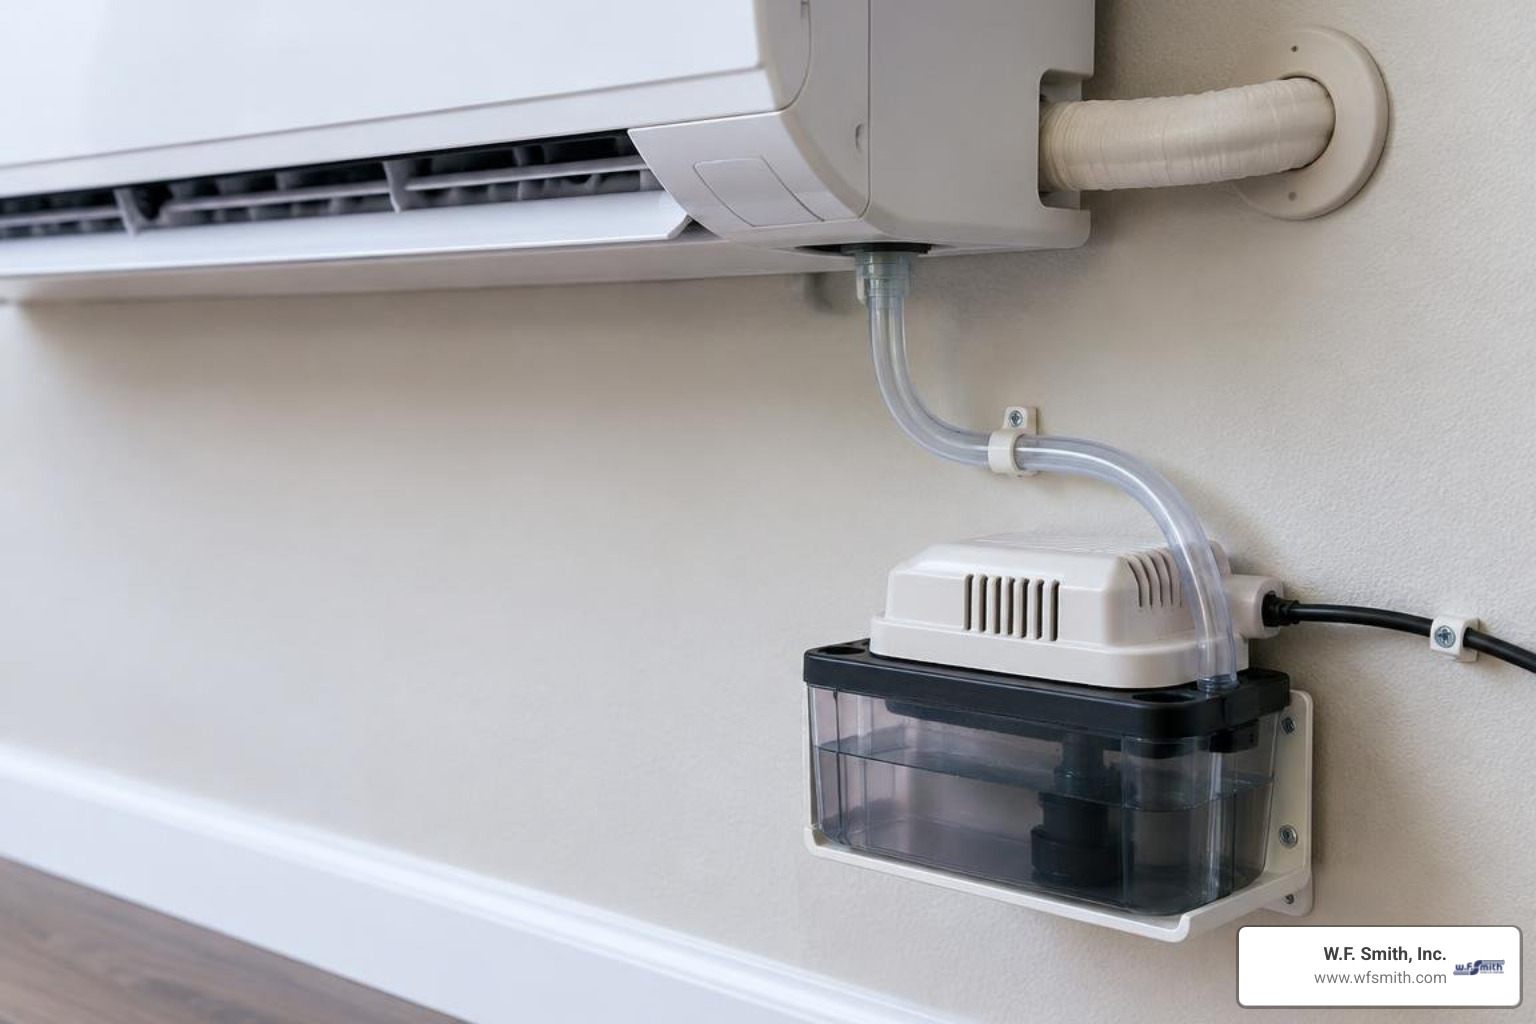
When a mini-split cools your home, it naturally wrings moisture out of the air. If the indoor head cannot drain outside by gravity alone, a compact condensate pump steps in to lift that water up and out through small-diameter tubing.
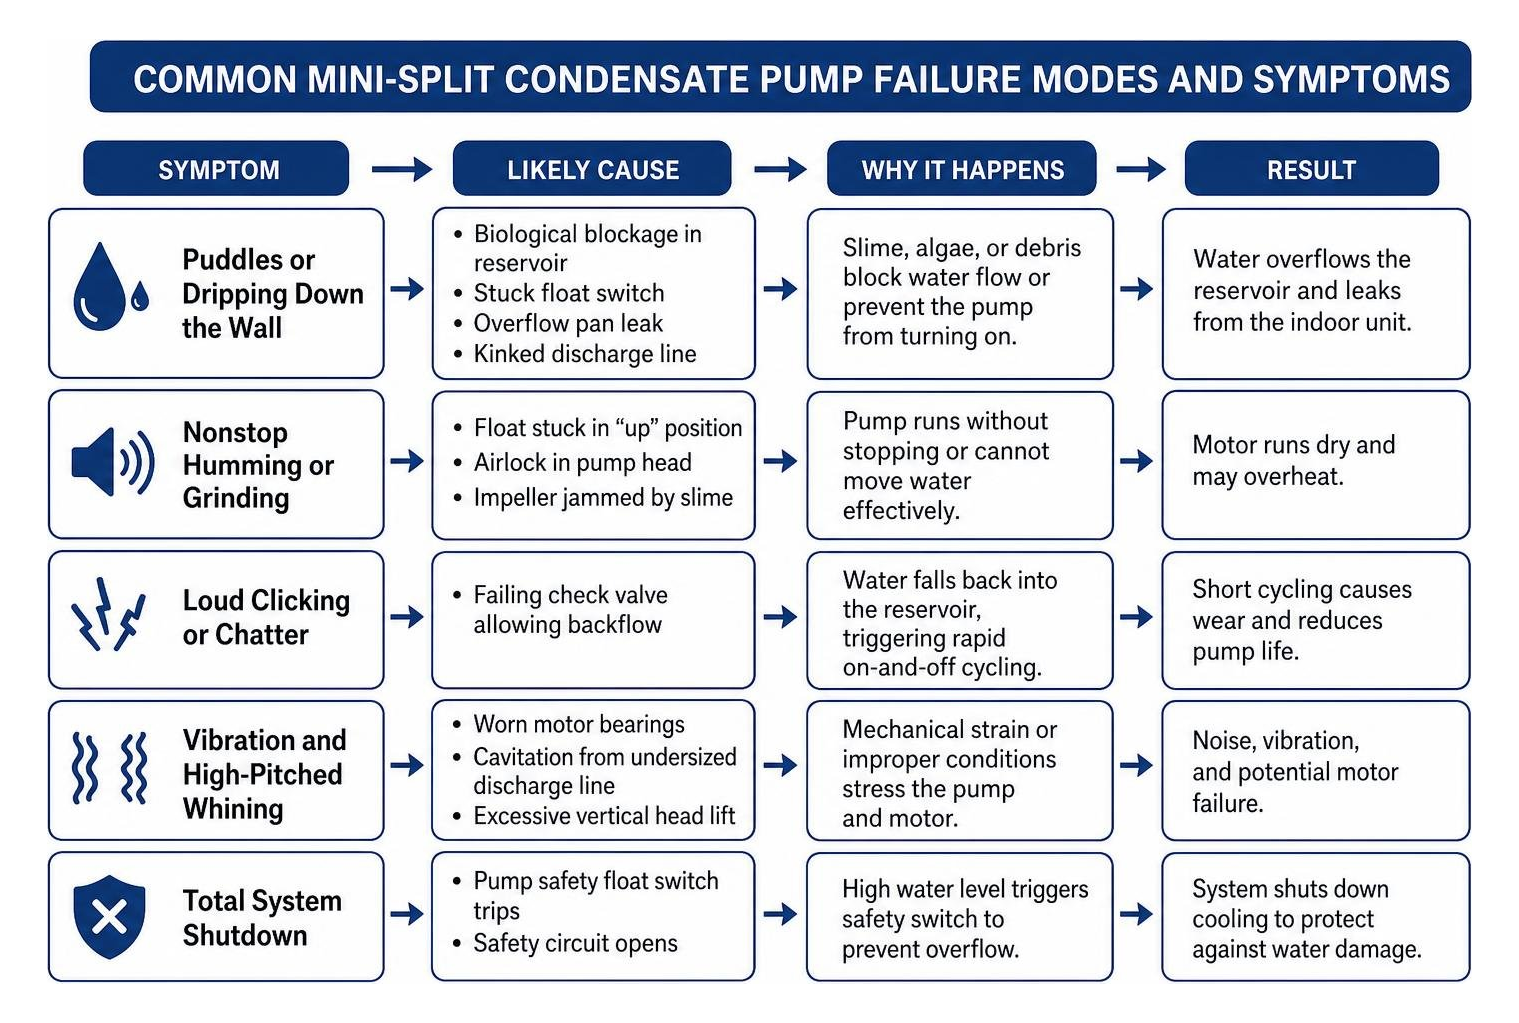
Because these pumps operate inside or directly alongside your indoor wall unit, any malfunction makes itself known quickly. Recognizing the symptoms helps you target the root cause before water damages your drywall, floors, or trim:
- Puddles or Dripping Down the Wall: Usually caused by a biological blockage in the reservoir, a stuck float switch that fails to signal the motor, an overflow pan leak, or a kinked discharge line.
- Nonstop Humming or Grinding: Points to a float stuck in the “up” position, an airlock in the pump head, or an impeller jammed by slime.
- Loud Clicking or Chatter: Often indicates a failing check valve allowing pumped water to fall back into the reservoir, triggering rapid on-and-off cycling.
- Vibration and High-Pitched Whining: Typically stems from worn motor bearings, cavitation caused by an undersized discharge line, or excessive vertical head lift.
- Total System Shutdown: Occurs when the pump’s safety float switch trips, breaking the low-voltage control circuit to protect your home from an overflow.
Diagnosing Stuck Floats, Clogs, and Check Valve Failures
Our HVAC team sees many pump issues caused by organic buildup inside the dark, damp reservoir. In high-humidity environments, algae, bacteria, and dust can combine into a gelatinous biofilm that coats internal parts.
- The Stuck Float: The reservoir contains a small magnetic or mechanical float that rises with the water level to close a microswitch or engage an electronic sensor. When algae glues this float to its stem, it either stays at the bottom, causing water to overflow without the pump turning on, or sticks at the top, forcing the pump to run dry continuously until the motor overheats.
- Discharge Clogs: Slimy buildup inside narrow 1/4-inch or 3/8-inch vinyl discharge tubing creates back-pressure. Persistent clogs can cause suction loss or line blowouts.
- Check Valve Breakdown: Condensate pumps rely on a small one-way check valve installed at the discharge outlet to stop lifted water from rushing back into the reservoir when the motor stops. Mineral scale and rubber fatigue can cause check valves to stick open or closed. If stuck open, water siphons backward, creating an endless cycle of short runs. If stuck closed, the pump can run without discharging water.
Electrical Failures: Seized Motors, Blown Fuses, and Tripped Switches
When mechanical components move freely but the pump remains dead silent, the issue may lie in the electrical pathway. Mini-split pumps use small fractional-horsepower motors, often running on 115V or 230V line voltage or 24V stepped-down control power.
If your ductless air conditioning system runs but the pump refuses to kick on, check these common electrical failure points:
- Thermal Cut-Off (TCO) Activation: Many pump assemblies incorporate a thermal protection sensor directly on the motor winding. If the motor runs dry or jams, this thermal device opens to cut power and help prevent a fire hazard. While some are auto-resetting, others blow permanently and require component-level replacement.
- Microswitch Degradation: In mechanical models, the float pushes a tiny microswitch lever. Over time, moisture can corrode the internal contacts or the internal copper leaf spring can lose tension, preventing electrical continuity.
- Blown In-Line Fuse: Some installations feature inline fuses on the power harness that can blow during sudden utility spikes or severe motor jams.
- Failed Capacitance Sensors: Modern ultra-quiet pumps can use solid-state capacitance sensors instead of moving floats. If these electronic sensors become coated in thick mineral scale, they may fail to detect water levels accurately.
Essential Tools and Safety Prep for Ductless Condensate Pump Repair
Working on a mini-split pump involves both water and electricity in close proximity. Taking proper safety precautions protects both your home’s electrical system and your equipment.
Diagnostic Tools and Safety Gear Needed for Ductless Condensate Pump Repair
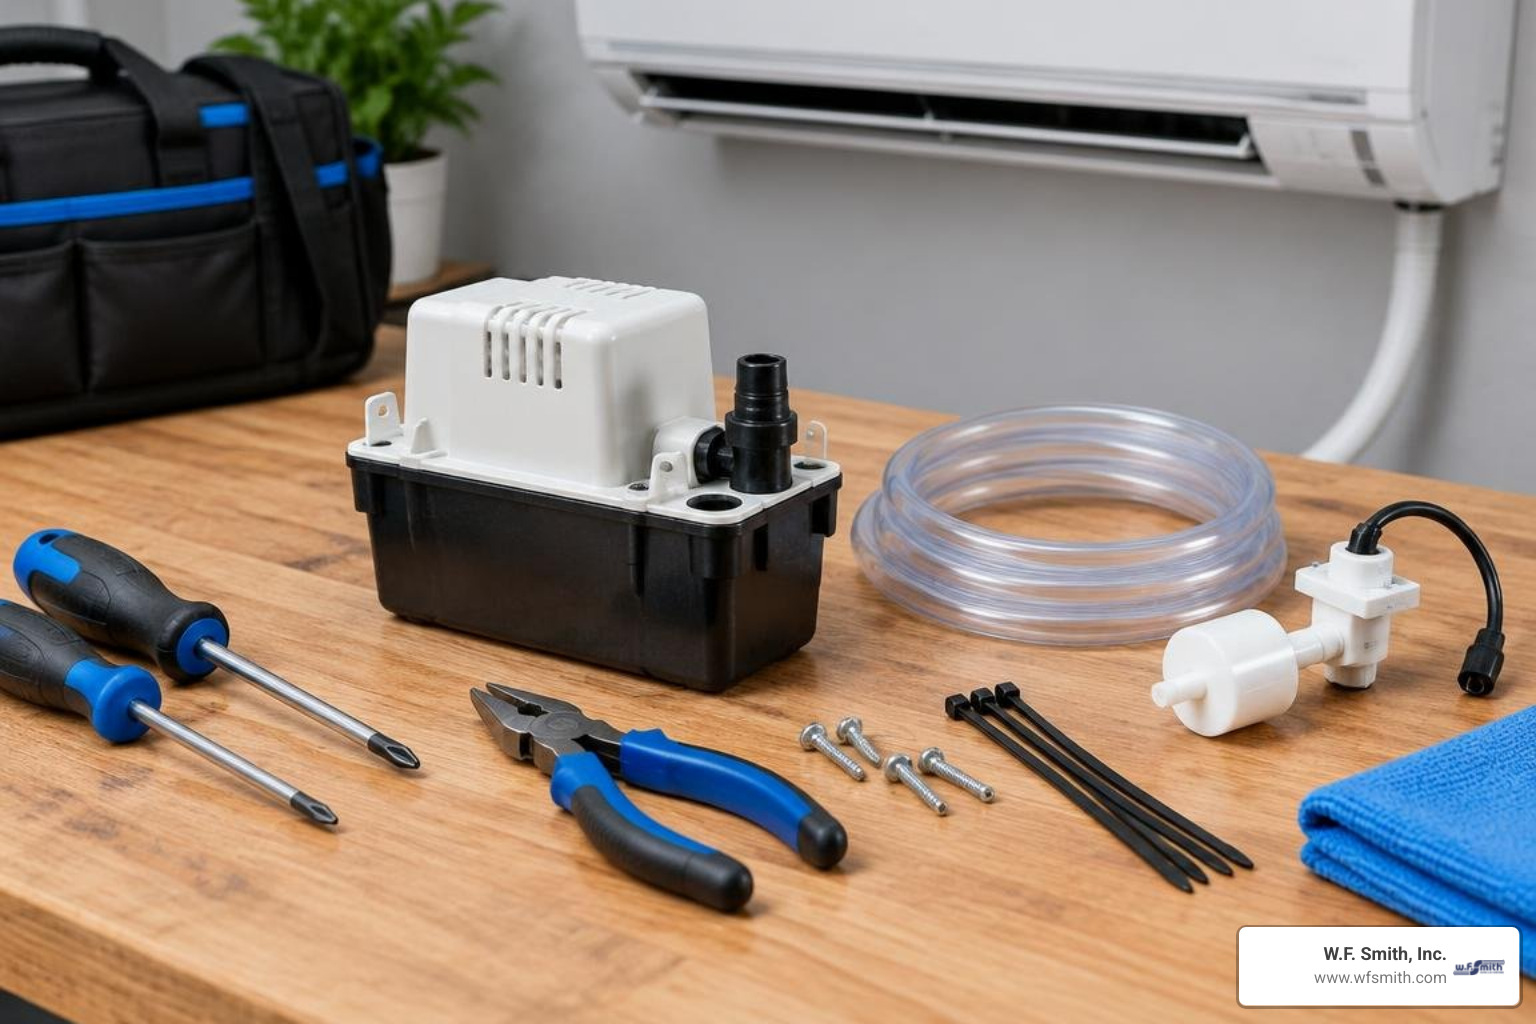
Before taking panels off the wall unit, gather these basic tools and supplies:
- Digital Multimeter: Rated CAT III for checking AC/DC voltage, continuity, and switch operation.
- Precision Screwdrivers and Hex Keys: For removing decorative line-hide covers and mini-split casing screws.
- Needle-Nose Pliers & Wire Cutters: For manipulating hose clamps, wire ties, and tight spade terminals.
- Small Wet/Dry Vacuum: Invaluable for clearing plugged drain tubing and pulling standing water out of the reservoir.
- Distilled White Vinegar: The safest, most effective cleaning agent for breaking down algae and mineral scale without degrading plastic casings.
- Small Nylon Bottle Brush: For scrubbing the float stem, corners, and impeller housing.
- Absorbent Towels and Shallow Basin: To catch spills when disconnecting inlet and outlet tubes.
- Safety Glasses and Insulated Work Gloves: Protection against electrical contact and mold spores.
Crucial Safety Step: Always disconnect the main electrical feed to both the indoor mini-split head and the outdoor condenser at the service panel before opening any pump compartment. If the pump is plugged into a standard wall receptacle, unplug it and verify power is completely off using your digital multimeter.
Step-by-Step Guide to DIY Mini-Split Pump Repair and Cleaning
Most pump repairs involve a thorough teardown, clearing biological blockages, and testing switch calibration. Follow this methodical sequence to restore normal drainage.
Disassembling and Cleaning the Reservoir, Float, and Impeller
- Access the Pump Assembly: Depending on your setup, the pump reservoir may be located inside the bottom of the indoor evaporator casing, inside an aesthetic corner line-cover duct, or tucked into an adjacent ceiling space. Remove the trim cover gently to avoid snapping plastic retaining tabs.
- Disconnect the Tubing: Carefully pull the clear vinyl inlet hose, which comes from the evaporator drain pan, off the pump inlet barb and drain any excess moisture into a towel. Next, disconnect the discharge tubing from the check valve barb.
- Remove the Reservoir Lid: Unclip the reservoir tank from the motor housing. Mini-split pumps usually feature snap-fit tabs that release with gentle finger pressure.
- Clean the Float Mechanism: Slide the float off its central post. Note its orientation because many floats have a specific magnetic polarity, and installing one upside down can prevent the pump from switching on. Soak the float, stem, and reservoir base in distilled white vinegar for 15 minutes, then scrub away biofilm with a soft nylon brush.
- Inspect the Impeller: Use a flashlight to examine the tiny centrifugal impeller located on the underside of the motor head. Remove any hair, lint, or debris wrapped around the shaft. Rotate the impeller gently by hand; it should spin smoothly without scraping the housing.
Clearing Blocked Discharge Lines and Servicing the Check Valve
A clean reservoir cannot pump water through a blocked discharge line.
- Flush the Line: Take your wet/dry vacuum outside to the exterior discharge point, or wherever the vinyl line terminates. Create a tight seal around the tube with a rag and run the vacuum for 60 seconds to pull out accumulated algae plugs.
- Flush with Vinegar Solution: From the indoor unit, use a squeeze bottle or funnel to feed warm water and distilled vinegar through the discharge line, ensuring fluid travels freely to the outside drain with no back-pressure.
- Inspect and Test the Check Valve: Unscrew or unclip the check valve from the pump outlet. Blow gently through the valve from the inlet side; air should pass through freely. Try blowing from the outlet side; the internal flapper or spring-loaded ball should seal instantly. If the valve allows backflow or resists outward flow, replace it. Replacement check valves typically cost between $5 and $15 and can reduce wear on the motor.
- Eliminate Line Restrictions: Ensure the vinyl line contains no sharp 90-degree kinks, sagging sections that trap airlocks, or long horizontal runs that exceed the manufacturer’s vertical lift specifications.
If you find a drain-line problem beyond a standard clog, our air conditioning repair team can restore proper drainage pitch, line integrity, and reliable AC operation.
Testing and Performing Electrical Ductless Condensate Pump Repair
If the pump is clean and unclogged but fails to spin, perform these electrical diagnostic tests:
- Verify Operating Voltage: Restore power temporarily and measure voltage across the pump’s primary power input terminals with your multimeter. Ensure it matches the nameplate rating, typically 115V or 230V AC. If voltage is absent, inspect your circuit breaker and wiring connections.
- Test the Float Switch Continuity: Turn power back off. Set your multimeter to the continuity/resistance setting, which measures resistance in ohms. Place the meter probes across the operational switch leads. With the float at the bottom of the reservoir, the circuit should read open, meaning no continuity or infinite resistance. Lift the float manually to the top of its travel; the meter should beep and indicate near-zero ohms of resistance. If the switch does not change state, the microswitch may have failed or the internal copper leaf spring may have lost tension.
- Diagnose the Thermal Cut-Out: An overheated motor can open its thermal cut-off sensor. Disconnect the motor leads and test continuity across the thermal switch on the motor winding. If the circuit is completely open on a cold motor, the cut-out may have permanently tripped. While handy DIYers can replace certain thermal cut-outs, replacing the entire pump assembly is often safer and more reliable.
- Check the Safety Circuit Switch: Condensate pumps incorporate a second internal switch: the high-level overflow safety switch. Test this switch with your multimeter across its dedicated leads, usually yellow or black. This circuit should show continuous continuity, normally closed, and open only when the float is lifted to the maximum overflow point.
Repair vs. Replace: Making the Right Call for Your Mini-Split System
While clearing clogs and cleaning floats are straightforward DIY tasks, internal motor and board repairs require weighing the cost of parts and time against a new unit.
| Factor | DIY Repair | Full Unit Replacement |
|---|---|---|
| Average Cost | $0 to $25 (vinegar, brushes, check valve) | $90 to $220 (complete replacement kit) |
| Typical Lifespan | Extends pump life by 1 to 3 years | Provides 5 to 10 years of reliable service |
| Labor Time | 1 to 2 hours of detailed troubleshooting | 45 to 60 minutes for a direct swap |
| Risk of Recurring Leaks | Moderate if bearings or seals are worn | Very low with fresh seals and warranties |
| Best Scenario | Biofilm clogs, stuck floats, bad check valve | Burnt motor, cracked basin, units older than 5 years |
As a general rule, if repair costs exceed 50% of the price of a replacement unit, or if the pump has been in service for more than 5 to 7 years, installing a new pump is often the most cost-effective choice. If you are experiencing repeated issues across your home comfort systems, an experienced HVAC repair technician can assess the drainage setup and electrical controls.
Integrating the Safety Float Switch to Prevent Water Overflows
A condensate pump should never operate without its overflow safety switch connected. When a pump fails, the mini-split continues to drain water into the reservoir unless the pump can signal the system to stop cooling.
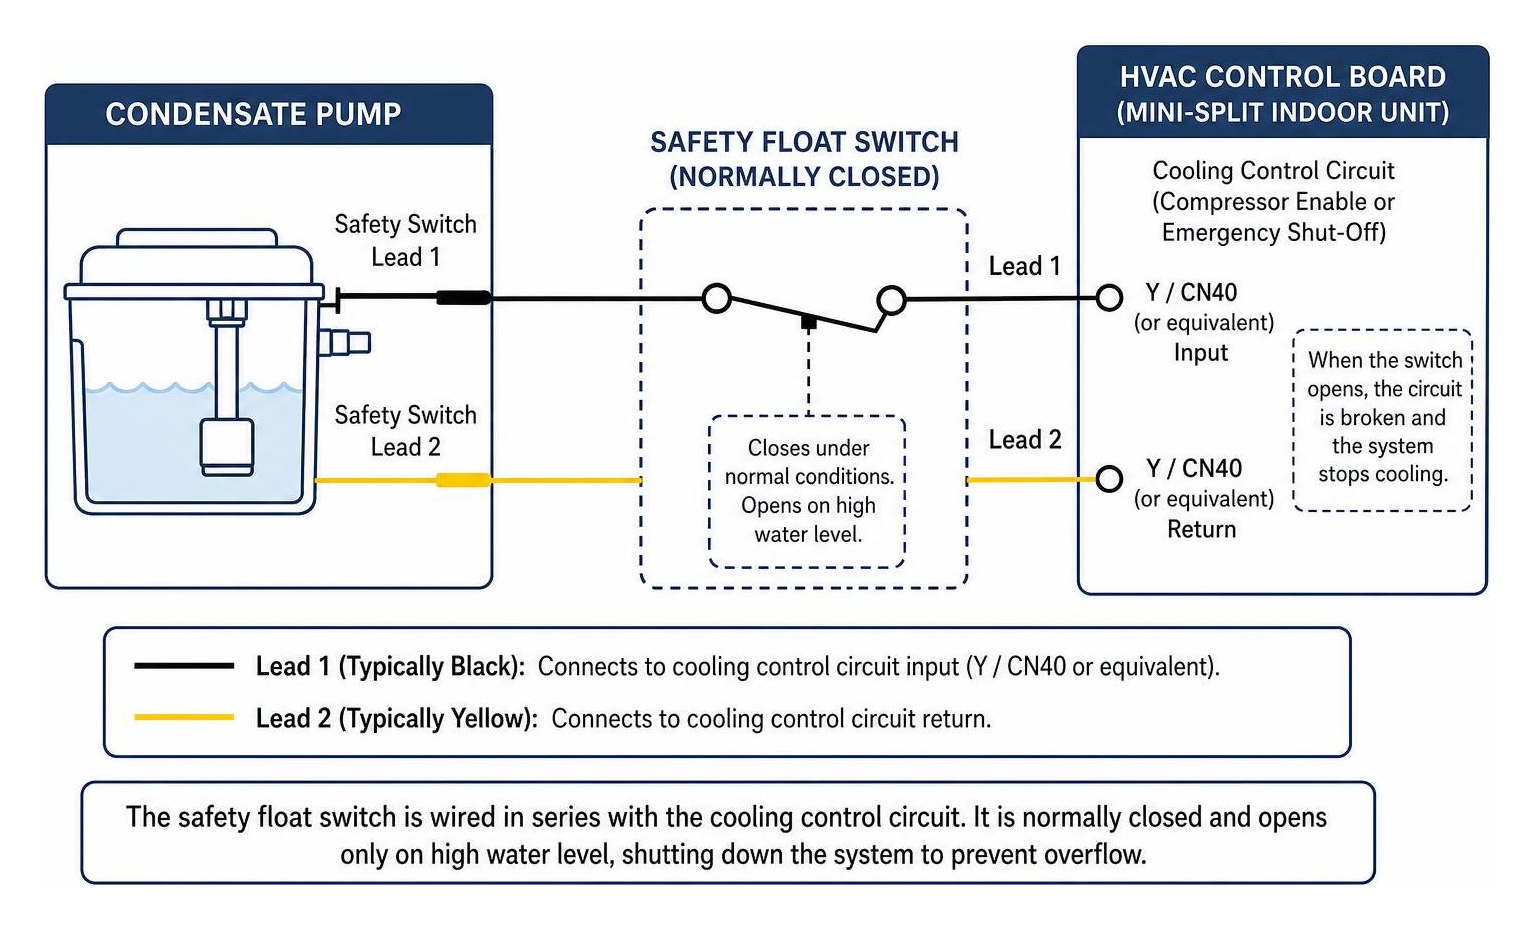
- Locate the Low-Voltage Control Signal: Mini-split indoor units communicate with outdoor condensers via dedicated communication terminals or 24V control lines.
- Wire in Series: Identify the cooling control circuit, commonly the $Y$ compressor signal or the unit’s dedicated emergency shut-off contact terminals, which may be labeled CN40 or similar depending on the brand.
- Connect Normally Closed Contacts: Wire the pump’s two safety float switch leads in series with this control line. Under normal conditions, the switch stays closed, allowing the air conditioner to run. If water rises above the activation threshold, the float rises, breaks the circuit, and safely shuts down the cooling cycle before water can overflow onto your walls.
Preventive Maintenance Schedule to Stop Future Failures
Regular, proactive maintenance can help prevent many ductless pump breakdowns. Keep your drainage running smoothly with this simple schedule:
- Monthly (During Peak Summer Cooling): Perform a quick visual check. Ensure no water is pooling around the casing and listen for abnormal grinding sounds.
- Quarterly (Every 3 Months): Pour 8 to 12 ounces of distilled white vinegar into the indoor unit drain pan to flush biofilm from the line and reservoir. Alternatively, place a slow-release condensate pan tablet in the evaporator tray to inhibit algae growth.
- Annually (Spring Startup): Disassemble the pump reservoir, clean the float stem, wipe the capacitance sensors, and test safety-switch shutdown functionality.
- Every 2 to 3 Years: Replace the inline check valve to help prevent backflow and reduce motor wear.
When your home feels damp even though the system is cooling, the moisture-removal issues explained in why your home is humid with the AC running can help you spot related comfort problems before they become more serious.
Water around the indoor equipment can also be confused with a refrigerant issue, so understanding AC evaporator coil leaks and how to fix them can help you describe the symptoms clearly when you contact an HVAC professional.
Frequently Asked Questions About Ductless Condensate Pumps
How often should a mini-split condensate pump be cleaned?
In standard residential settings, thoroughly clean your pump reservoir and flush lines every 6 months. In humid climates, during continuous summer operation, or in commercial environments, inspect and clean the reservoir every 3 months to prevent algae buildup from locking the float switch.
Why is my ductless condensate pump running continuously?
A pump that runs nonstop is almost always dealing with a float stuck in the “up” position due to algae accumulation, a failed microswitch whose internal spring has bound, or a completely blocked discharge line that prevents water levels from dropping. Inspect the float stem first and ensure it moves freely.
Can a failing condensate pump cause my air conditioner to shut off?
Yes. If the safety overflow switch is wired into the system control board, a high water level will immediately trip the circuit. This shuts down the compressor or displays an error code on the indoor head (such as an overflow or drain error) to protect your home from water damage.
Keep Your Ductless System Running Quietly and Dry
A leaking or noisy condensate pump does not have to ruin your indoor comfort. By systematically inspecting the reservoir, freeing stuck float mechanisms, cleaning slimy discharge lines, and testing electrical switches, you can resolve many mini-split drainage issues.
When dealing with deep electrical faults, cracked internal basins, or complex multi-zone installations, professional care makes all the difference. For more than 80 years, the W.F. Smith, Inc. team has provided dependable heating, cooling, and indoor-air-quality solutions throughout the greater Philadelphia area. The team supports homeowners with emergency repairs, scheduled maintenance, and new equipment installation backed by 24/7 service and a 100% satisfaction guarantee.
If your ductless system is leaking, making unusual noises, or shutting down unexpectedly, contact our professional ductless HVAC technicians for help restoring dependable, leak-free comfort.